Earth Rider
  • Home
  • Blog
  • About
    • Learning Center
    • Explore Ebikes
    • Newsletter signup
    • Privacy Policy
    • Refunds
    • Learning to Ride a Bike
  • Shop
    • Ebikes
    • Bikes >
      • Youth Bikes
    • Lights
    • Helmets
    • Bags and baskets
    • Accessories >
      • Pedals
    • Outerwear >
      • Glove Box
    • Apparel
    • Bicycle inspired goods >
      • Greeting Cards
  • Service
  • Rentals

How to Choose the Right Pedals

12/26/2022

 
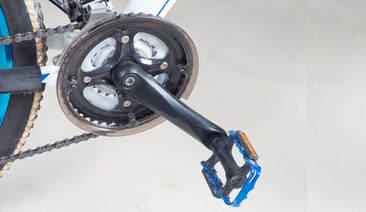
Bike drivetrain, crank, and pedal
If you're still riding around with the basic pedals that came with your bike it is time to make an upgrade.  Pedals that come on new bikes are generally designed to meet a low price point and do not take into consideration your unique riding style and requirements.  Due to their constant movement and force placed on them pedals wear out quickly.  Bike pedals come in a variety of shapes, styles, and sizes and are easy to upgrade so knowing why and when to do this is worth investigating.

​The Role of Pedals on a Bike
Bike pedals are one of the three contact points the rider has on a bike, the other two being the saddle and handlebars.  Pedals are universal in their purpose: 1) put power to the drivetrain, 2) move the rear wheel, and 3) propel the bike forward.  But even though the purpose of a set of pedals on a bike is clear, it is accomplished with many different designs and materials that we will review below.    

Reasons to Upgrade Pedals
  1. Secure footing – When you push down with your foot, you want your foot to stay on the pedal and not slip off and there not to be excessive, wasteful movement. 
  2. Bike control – Having feet secure results in control of your bike’s movement.  You will be able to ride harder, maneuver, and descend better.
  3. Efficiency – Do not allow power to escape between you, your shoe, and your pedal.  Some claim a good set of clipless pedals can give you up to 30% more power out of each pedal stroke.
  4. Safety – Having your feet firmly planted on pedals gives you control of your bike at all times reducing the likelihood of losing your footing, slipping and falling.
  5. Smoothness – There are bearings in a pedal to allow them to rotate and if they are worn and start grinding it will affect your pedal stroke and your ride.
 
Considerations for Choosing Pedals

Depending on your experience level and the type of riding you do, there are different types of pedals that can optimize your ride. Some things to think about are:
  1. Cycling experience – Are you a beginner or casual rider or an experienced cyclist wanting to optimize your performance or take your riding up a level?
  2. Type of riding - Do you ride in an urban setting with lots of starts and stops and obstacles that you must slow down or stop for?  Or are your trips long where you can settle into a riding position?  What about terrain; paved, dirt or gravel? 
  3. What performance do you want – Do you want power in your pedal stroke to build up speed and allow you to fly around corners?  Do you need to have good control your bike over technical patches? Or do you ride at a slow, cruising speed?
  4. Weight – Do you want to keep your bike weight as low as possible to aid in acceleration and speed? Or are you riding an ebike where weight is not an issue because you have an assist from the motor and battery? 
Picture
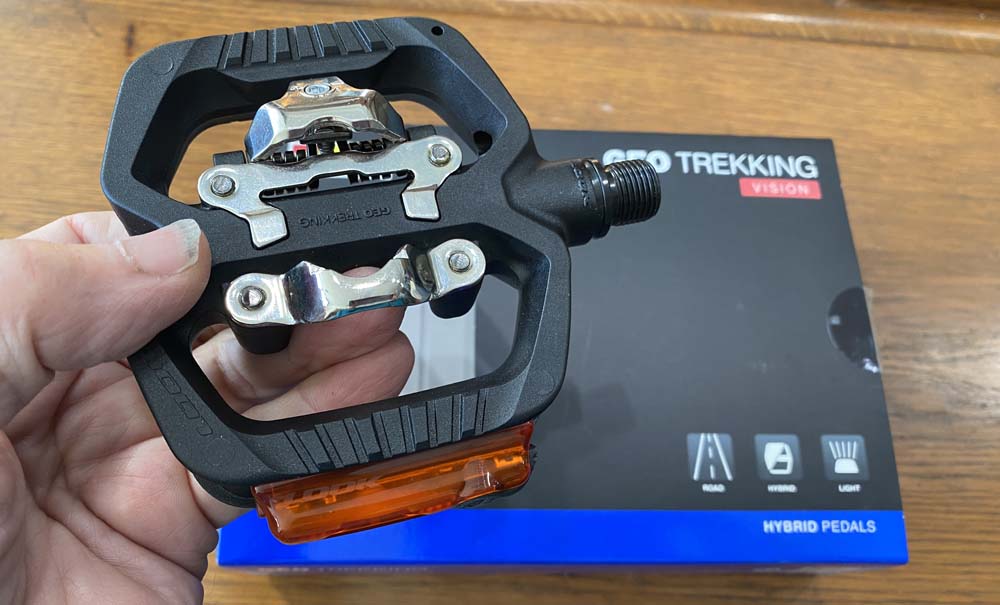
Pedals with SPD two-hole cleats and rechargeable lights on the side
​Types of Pedals
There are three general types of pedals, each has pros and cons and which one is best for you will depend on your requirements. 
​
1.  Platform
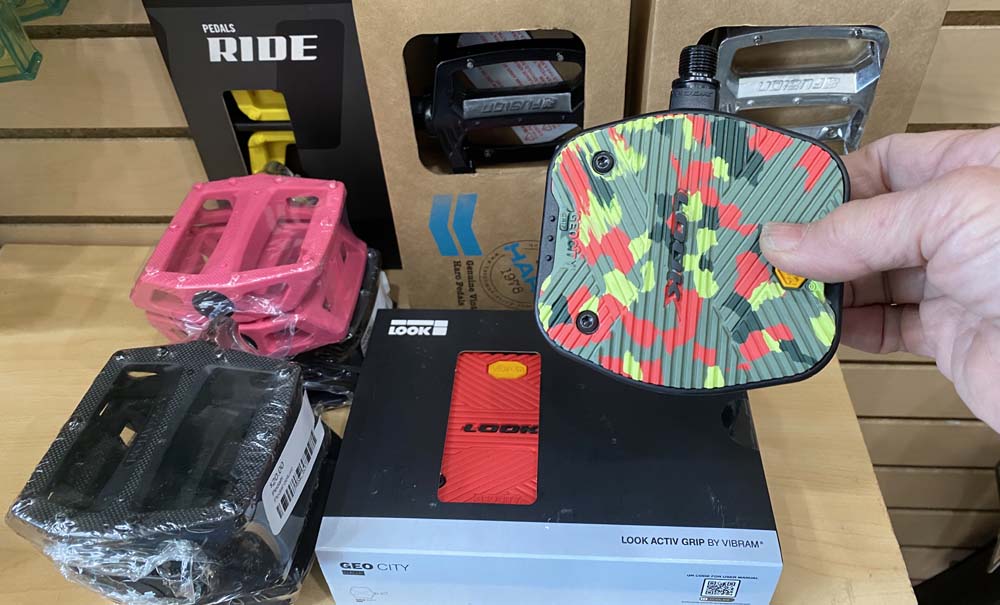
Platform pedals are the style that comes standard on most bikes.  There are basically two axle sizes, ½ inch, common on kids and some vintage bikes, and 9/16 inch.  They can be two sided pedals with the same style on each side so you do not need to rotate the pedal to put your foot on it, or one sided with a different style on each side.  A one sided pedal is good for different types of shoes so you do not have to change your pedals each time you want a different configuration.  They are made from metal or plastic or a combination of both and some have stationary or replaceable pins to grip your shoe.  Some have reflectors or lights on the sides and come in a variety of colors to customize your ride.  While they are available at a value price point starting at $10 for a pair, there are high-end platform pedals you can upgrade to for $100 or more made of lightweight aluminum and finely machined bearings in the axle for a smooth, easy rotation. 
PROS
  • Quickly take your feet off the pedals so you can put on the ground to stop
  • Move your foot around on the platform for a variety of positions
  • Wear any type of shoes
  • Styles are available at a bargain price
CONS
  • Less efficient because there is no power on the pedal upstroke
  • Feet can fall off the pedals
Platform bike pedals from Look, Fyxation and Haro in colors and patterns
Examples of platform pedals
​2.  Toe Clips
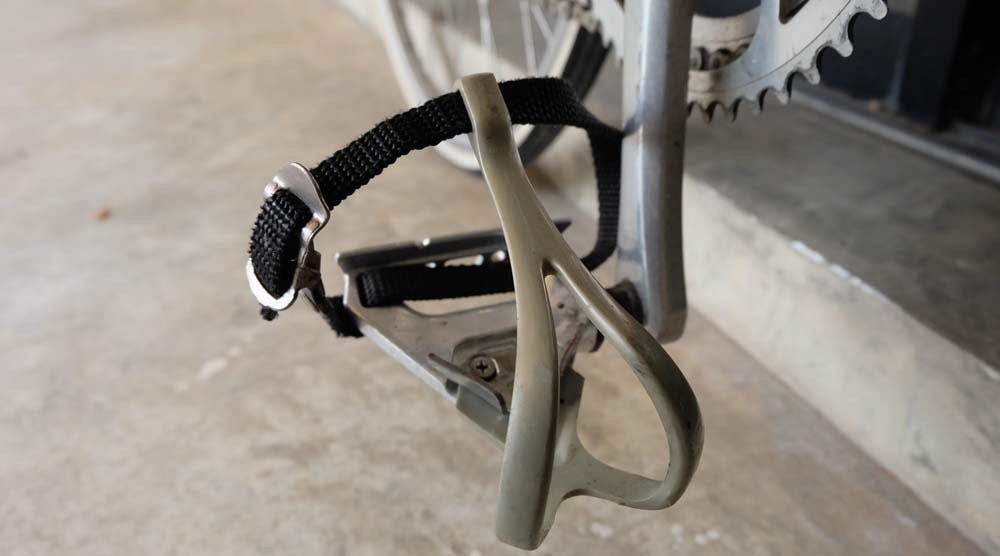
A system of toe cages and straps was developed over a hundred years ago for bike pedals as a way to secure feet to the bike and allow power to be applied on the upstroke as well the downstroke.  This is especially beneficial when pedaling up hills.  Metal or plastic cages combined with leather or woven nylon straps attach to platforms designed to accommodate toe clips.  Slots are needed to insert the straps so not all platform pedals can be converted to toe clips.   PROS
  • Allows power to be generated from both pushing down and pulling up with the legs 
  • Wear any type of shoes
  • Provides pedal efficiency at less cost than clipless pedals
CONS
  • Inserting and removing shoe takes practice to remember to pull the foot back when dismounting
  • Single sided only so you have to use the toe clips every ride or they will drag on the ground
  • Straps can loosen and need to be retightened, sometimes during a ride
Toe clip pedals on a bike crank
Toe clip peals with an aluminum platform and woven straps.
​3.  Clipless
Toe clips described above were popular until the 1980s when an alternative pedal system was developed where a cleat installed on the bottom of a shoe literally clipped into the pedal to hold the shoe/foot on the pedal.  The nomenclature is a little confusing, but these are called clipless to differentiate them from the clipped-in system of toe clips. 

Within clipless pedals are a variety of styles but the general method they function is the same.  There are three parts to the system; the shoe, the pedal and the shoe cleat that is mounted on the underside of the shoe.  A two, three, or four hole cleat attaches to the bottom of a cycling specific shoe and this clicks into the bike pedal via a spring loaded mounting system.  The cleat is clicked into the pedal by exerting downward force with the foot and is released by twisting the foot laterally to unclip the cleat.  The spring mechanism on the pedal is able to be adjusted tighter or looser depending on how secure you want the shoe to be on the pedal on the upstroke and how easy you want it to be able to unclick it.  How much your foot can move side to side before unclipping is called "pedal float."  Options include single sided (platform on one side and clipless on the other) or double sided (clipless on both sides), with or without pins, small or large platform for the shoe, and rechargeable lights on the sides.  

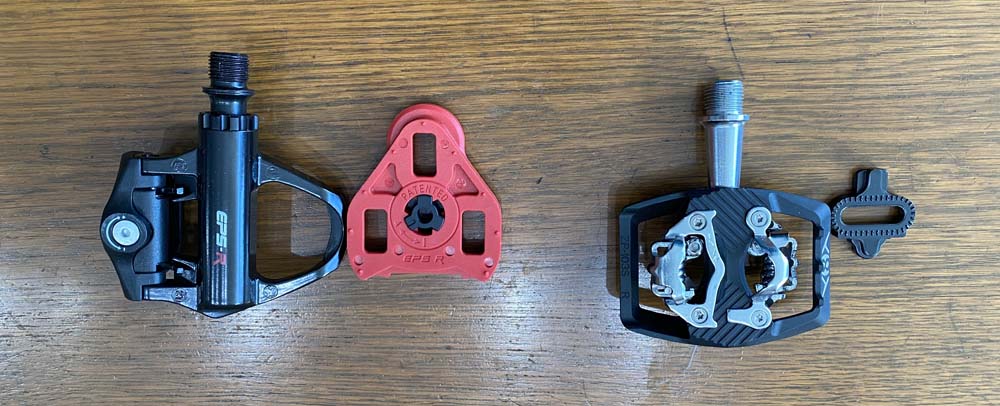
The two-hole cleat design is popular for mountain, casual, commuter, touring, and some road bikes.  Named after the leading manufacturer of this pedal type, they are often referred to as SPD pedals (Shimano Pedaling Dynamics) although there are many other manufacturers of this design.  In this system two holes are designed under the ball of the shoe and the cleat can be adjusted slightly forward, backward, and laterally.  The cleat is recessed to the cycling shoe making it easier to walk off the bike.

The three-hole cleat design is popular for road biking.  This cleat protrudes out on the bottom of the shoe making it easier for the shoe to clip into the pedal and it covers more surface area enabling it to withstand the pressure on the tendons of the foot and burning sensation that can be created pedaling hard on a road bike.  These are often referred to as Look pedals after the company that developed them.  Since the cleat is plastic, they are usually lighter than two-hole cleat systems. 

The four-hole cleat design can be found on pedals from Speedplay and Time that tweaks the force applied.  ​
PROS
  • Allows efficient pedaling with both a downstroke and upstroke 
  • Enables the most control on difficult terrain
  • Available with a wide variety of styles
CONS
  • Inserting and removing foot requires practice 
  • Foot may feel constrained since it is locked into the same position every time
  • Fine adjustments should be made with a professional bike fitting to position the foot in the correct position on the pedal
  • Mechanical parts requires routine cleaning, lubing and adjusting of springs and screws
  • Requires special shoes that are hard to walk on off the bike
  • Shoes, cleats, and pedals with different cleat designs are not interchangeable
Clipless road pedal with a matching three-hole cleat next to a multipurpose pedal with a SPD style two-hole cleat.
Clipless pedals and cleats. Left is pedal and three-hole design cleat, right is pedal with two-hole design cleat.
​Options for a pedal upgrade on your bike range from the simplicity of a flat pedal to the cost efficient toe-clip to the modern clipless pedal system.  While we are not in favor or replacing components that aren’t broke, sometimes a fresh start with new pedals will add more enjoyment and safety to your ride.

Comments are closed.

    Earth Rider Blog about Cycling


    Author

    Sharon Kaminecki and others comment on adventures in bicycling and other stories

    Categories

    All
    Being Visible On Your Bike
    Bike Comfort
    Bike Safety
    Buying A Bike
    Cycling General Interest
    Learning About Ebikes
    Protecting Your Bike


    Archives

    January 2023
    December 2022
    November 2022
    October 2022
    September 2022
    August 2022
    July 2022
    June 2022
    May 2022
    April 2022
    March 2022
    February 2022
    January 2022
    December 2021
    November 2021
    October 2021
    September 2021
    August 2021
    July 2021
    June 2021
    May 2021
    April 2021
    March 2021
    February 2021
    January 2021
    December 2020
    November 2020
    October 2020
    September 2020
    August 2020
    July 2020
    June 2020
    May 2020
    April 2020
    March 2020
    February 2020
    January 2020
    December 2019
    November 2019
    October 2019
    September 2019
    August 2019
    July 2019
    June 2019
    May 2019
    April 2019
    March 2019
    February 2019
    January 2019
    November 2018
    October 2018
    September 2018
    June 2018
    May 2018
    March 2018
    February 2018
    January 2018
    November 2017
    October 2017

Earth Rider logo of earth intersected with a banner with an image of a cyclist and the words Earth Rider in colors blue, green, aqua, black and red

Address

1873 N Milwaukee Ave
​Chicago, IL 60647

Phone

773-360-1816

Email

bikefun@earthridercycling.com

Payment methods:
Credits card visa, mastercard, american express, and discover
Sign up for our newsletter - click here.

Winter Hours              

Wed. 10am - 8pm
Thu.   10am - 5pm
Fri.      10am - 5pm
Sat.      10am - 5pm
Sun.     Closed
​Mon.    Closed
Tues.    Closed
Or by appointment--contact us!
SPECIAL HOURS:  Closed 1/20-24 for Brazen Dropouts Bike Swap; 2/7-9 for CABDA Midwest
  • Home
  • Blog
  • About
    • Learning Center
    • Explore Ebikes
    • Newsletter signup
    • Privacy Policy
    • Refunds
    • Learning to Ride a Bike
  • Shop
    • Ebikes
    • Bikes >
      • Youth Bikes
    • Lights
    • Helmets
    • Bags and baskets
    • Accessories >
      • Pedals
    • Outerwear >
      • Glove Box
    • Apparel
    • Bicycle inspired goods >
      • Greeting Cards
  • Service
  • Rentals